It’s a beautiful day for a bike ride, but where should you ride? Maybe you’ve never explored past the few blocks of your neighborhood and you want to find that bike path nearby. Maybe you’ve already found some of those nearby bike paths, but want to explore farther. Maybe you’re in a new town and want to explore the city by bike with a fun bike route.
I usually find these nearby bike paths and routes by looking at maps and making some educated guesses. It’s always fun, and sometimes an adventure. Come along with me for the ride and I’ll show you how to go for a bike ride wherever you are, whatever the infrastructure.
I’ll go through the concepts for how to use Google Maps to plan a safe, fun bike route, and then I’ll go through an example for Nashville, Tennessee (since I’ve never been there) and plan some fun bike routes that I’d ride.
I made a video with the same content if you’d like to learn this via video instead.
Before I start, I want to mention that my other favorite tool to plan bike routes is with bicycle heatmaps found on Strava or Ride with GPS. The global heatmaps on these apps show you exactly where other people ride their bicycles, so you can clearly see where the best routes are as they are used most and pop out on the heatmap. Ok, back to Google Maps for now…
Activate the Bicycling Layer on Google Maps
Google Maps, while having lots of room for improvement, is a great tool for finding bike paths and directions. They keep track of all the bike trails, dedicated bike lanes, bike friendly streets, and even bike friendly dirt/unpaved roads. But this display is not on by default (and doesn’t show up even if you get Biking directions), so you have to turn it on to do your route research.
- On mobile: Tap the layers icon in the top left corner, then tap the Biking details layer
- On desktop: Hover over the “Layers” icon in the bottom left corner, then tap the Biking details layer

Voilà, you now have all the bike routes at your fingertips! It’s time to look around.
Make Use of Street View and Satellite View
I know, it’s so cool to see all the bike friendly routes right there on Google Maps. But you never really know what it looks like until you check it out in real life or on Street View. My preferred way of activating Street View is like so:
- Mobile: long press anywhere on the map and a pin will drop. An image will appear on the lower left corner if street view is available. It has a little spin around circle icon. Tap it!
- Desktop: click somewhere and the address will show up at the bottom of the screen. There will also be an image to click for street view if available.


Satellite view is another great tool if you want to browse a bit quicker (since navigating through Street View can be a slow experience) and look for bike lanes and trails from above. I’ve also found trails on Satellite that don’t exist at all on the default map layer.
Look For the Long Green Lines, Parks, and Green Spaces
My favorite leisure bike rides are the ones with lots of nature or some beautiful architecture. Usually it’s nice to go on one path for a while, so I look for the long solid green lines that indicate either a bike trail or a dedicated bike lane. Again it’s handy to see what the bike lane or trail really looks like on Street View. Off street trails often won’t have a Street View, which usually means it’s a path away from vehicle traffic!
I’ll also pick some nice looking parks or landmarks to use as a destination for a picnic or a rest stop. Sometimes the long bike lane itself is the destination, since there’s usually lots of great scenery along the way.
Linear parks are especially nice. These are long parks with a shared use trail, often next to a river, lake, or old railroad track, but can be anywhere! What’s nice about the river and lake paths is they are usually flat. Rivers have some slope but it’s usually not very noticeable.

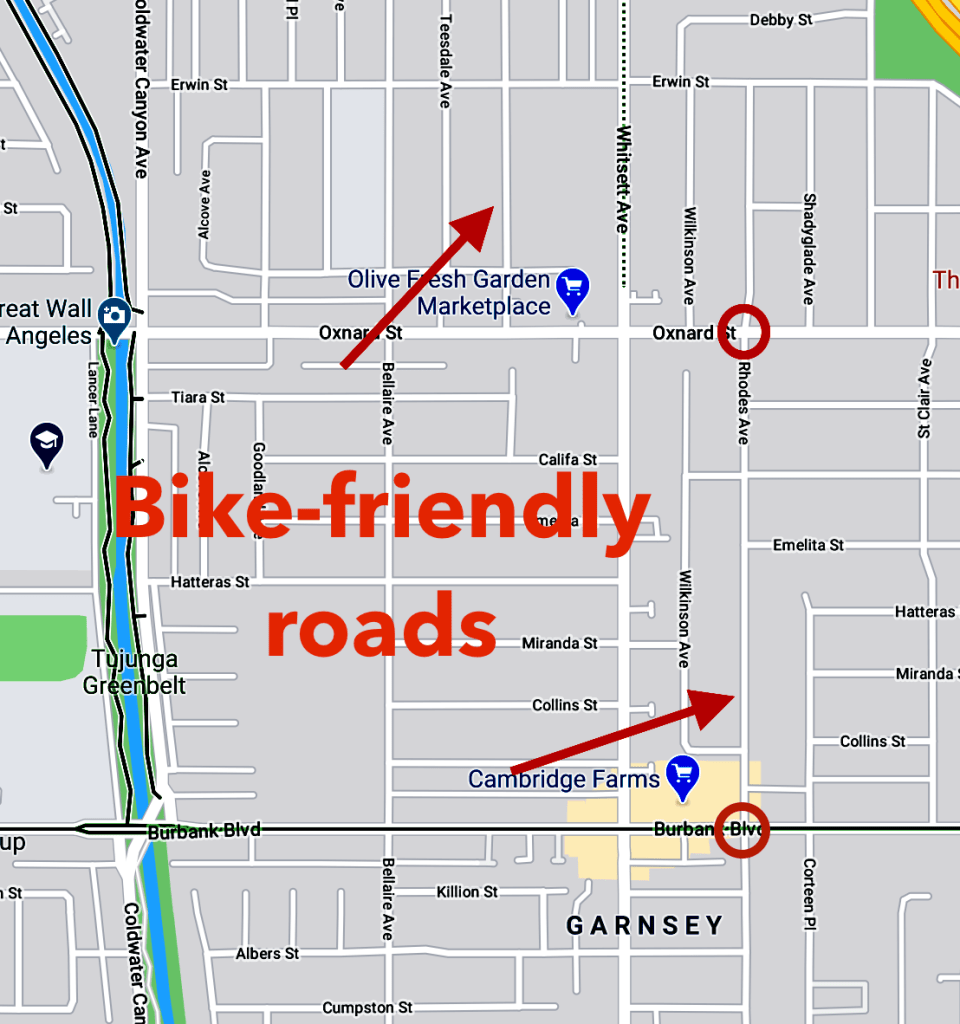
Watch Out For Google’s “Bike-Friendly Streets”
Aside from the solid lines indicating trails and dedicated bike lanes, Google Maps has a dotted line for “bike-friendly roads.” (Not to be confused with the dashed line for unpaved/dirt roads)
This bike-friendly road notation includes mostly two types of roads:
- Safe, quiet, nice roads to ride your bicycle on. Usually in a residential neighborhood with no painted lane markings.
- Busy car-centric streets with lane markings for cars and no bike lane, but it’s likely the only convenient road available for all road users and maybe it’s an “official” bike route with the local jurisdiction.
Most of the time I do feel safe on a bike-friendly road, but there are times when I do not, and it’s a shame that this is not guaranteed. Sometimes I have encountered a “bike-friendly road” on which I’d rather ride the sidewalk or make some kind of detour. If you have suspicions about a road (usually if it looks like a main or arterial road), check out the Street View to really see what it looks like. Be sure to look for a shoulder too, because a large shoulder can give enough room to ride safely even with car traffic nearby, as long as nothing is blocking it.
Find the Secret Bike Friendly Streets
When a street first appears on Google Maps, it is by default NOT a bike-friendly street…but that doesn’t mean it isn’t a great street to bike on. Because not all streets have a bicycle expert surveying whether or not it’s bike friendly (maybe they should!), this means there are TONS of roads that are very bike friendly, but are not notated as such on Google Maps. Often these are neighborhood streets in between the main arterial roads where cars are routed.
If you don’t see a clear safe route on the map, look a little closer for the off the beaten path roads where mostly local traffic goes. You can experiment with these while you’re out riding.
One example is in Los Angeles. If you zoom in to a flat neighborhood and tap around with Street View, you’ll see that these are great streets to bike on with only some local car traffic doing last mile car trips. The one downside in LA is that once you get to a large stroad with 3 lanes of car traffic each way, it may be tough to cross to continue on another pleasant neighborhood street. Sometimes I’ll take a neighborhood street just behind a main road so I can go back to the traffic light to cross more safely.
Load up Biking Directions to See the Hills
While Google Maps does have a Terrain layer, it leaves more information desired about the hills. The best way to see exactly how much hill you’ll be riding is to make the route on Google Maps and look at the elevation graph. You can add, change, and remove stops, and if you’re on desktop you can drag around the route to figure out exactly how much incline you’ll be dealing with. Once you have the route mapped, you can hover over the route on desktop to see exactly where the biggest hills are (so you can detour around them if you’d like).

Beware of the “Mostly flat” designation when you plan a bike ride. I always click the dropdown arrow to see what the elevation really is. For example, on this short ride down Valencia St in San Francisco, one direction is clearly uphill while the other way is clearly downhill. Yes it’s mostly flat, but depending on your bicycle you may still have to work harder on the uphill, and it’s good to know ahead of time.

An Example: Exploring Fun Bike Routes
Let’s plan a fun bike route in a city I’ve never been before. Nashville, Tennessee sounds good. Here’s a map of what looks like the main part of Nashville with lots of green lines (aka bike routes). I’ve since been to Nashville and successfully explored some of these routes!

As you can see there are many long green lines with potential for a nice bike ride.
- There are a few paths next to the rivers that look interesting. Both downtown and a little east.
- There’s also what looks like a mountain bike park in the lower right part of the map. (You can tell the dirt roads by the dashed line instead of the dotted line. The map key is currently wrong)
- There are a few bicycle trails in the lower left part of the map that look like they could be fun.
- If I zoomed in a bit more to downtown and other places, there might be some good urban rides and commute routes.
I’ll focus in on the lower left, because I want to know how hilly the route is. Seeing all the twists and turns it’s likely there are some hills. Let me turn the terrain layer on (the same way you turned the biking layer on) and this is what I see…

Ok, it looks pretty hilly, but I want to get some more specific data. It’s hard to tell from this exactly how hilly the route is. It might even be a ridge route at the top of the hill for most of it. So, I’ll just tap the map and get directions to a random point on the map. This is easier on desktop, but can be done on mobile too.

Ok, now I have a better feel for the route. You can see that there’s 522 ft of climbing and 364 ft of descending. On desktop, you can easily drag around the lines and add waypoints to find out more and decide how much climbing you want.
So now let’s go back to downtown and zoom in some more…

Once zoomed in, some of the “bike friendly streets” show up that didn’t before. I also see this nice looking bike path loop in the lower left corner by Sylvan Park. Say I want to bike to that nice green loop and I’m curious about the quality of this “bike-friendly road” so I click it. Now it looks like this:

Once I click the image at the bottom of the screen, it brings up the Street View and I can take a look around.

This looks like a low-traffic neighborhood street, so I’m happy biking on it. And lastly I want to see what the path really looks like, so I found this next screenshot from a street next to the park.

Looks like a nice path! I know what I’m doing when I visit Nashville. I have since visited Nashville and rode my bike on this path, which is called the Richland Creek Greenway.
Satellite view is another good option for figuring out what a path or road looks like or to see if something really does connect. Just zoom in all the way and pretend you’re on government espionage.
Other Mapping Tools
Google Maps is one of the most accessible and easiest mapping tools, but there are other tools I like to use as well to supplement this data…since the Google Maps data is mysterious in its origin and can be out of date.
Locally Made Maps (physical or online)
Check with your local bike shop/coalition to see if they have any quality local bike maps! When I first moved to San Francisco, Google Maps biking directions was still sub par, and I mapped all my city rides with the physical version of the SF Walking & Biking Map. I got this by signing up for the local SF Bike Coalition, but it was also available at local bike shops along with other routing books and maps. I looked at this before every ride to see where the safe routes were and to avoid the SF hills. It was very useful.
A bit of web searching can also reveal other bike specific maps. For example Googling “napa bike map” reveals the second result with a few recommended bike rides PDF. I usually compare these maps to Google Maps to make sure it is indeed a good route, checking for bike lanes, bike-friendly roads, and other parks or detours I may want to explore nearby.
Global Heatmaps and Custom Route Drawing
Cycling heatmaps are arguably better at finding safe, fun bike routes than the Google Maps Biking layer. The global heatmaps show you exactly where other cyclists go, and that means the best and safest routes, with a guarantee that people have ridden there. If you have a phone mount, biking with a heatmap visible really opens up possibilities for new routes.
Strava & Ride with GPS are two heatmap apps I use. Strava is more popular with over 120 million users (but not all cyclists), but Ride with GPS is for biking only and has destination routing.
With Ride with GPS, you can select the “Record” button at the bottom of the screen which will reveal the heatmap with no other routes cluttering it, and you can search for a destination and have the app route you directly there with the heatmap still visible. A great feature for riding somewhere specific.
Strava doesn’t have a feature to route to specific addresses or destinations, and also for some reason doesn’t allow you to zoom in very close, which is just simply annoying.
If you’re a Strava Pro subscriber, you can draw a line anywhere on the map and Strava will create a ride for you just from the flick of your finger. That is a pretty cool feature when you know kinda what route you want, but don’t want to build the whole thing from scratch. I don’t use this for commuting though, only for leisure rides.
Besides Strava and Ride with GPS, here’s a list of other useful online maps. Usually this data is in Google Maps, but you may be able to find some other gems.
- Rails to Trails is an organization that turns old railroad tracks in the USA into shared use paths. There’s an online map called Trail Link that has all of these as well as other nice bike paths.
- OpenStreetMap has a cycling layer that can be useful. It has similar data to Google Maps, but I find it harder to read. If someone is an expert at using OSM to plan bike routes, let me know!
Conclusion
The possibilities for a bike ride are limitless. I’m always a fan of exploring close to my house first, since it means I don’t have to get in a car at all and I don’t have to put my bicycle on a bike rack, which can be a hassle.
Let me know what fun bike routes you find using this guide in the comments. And tell me what other tricks you use!
Make sure you bring some bike essentials on your ride and any gear you need to keep comfortable. If you plan to stop anywhere, don’t forget to bring your lock so you don’t have to worry about leaving your bike alone for a bit.
Other posts you may be interested in:
- The Best Rear Bike Racks to Carry Things On Your Bicycle
- The Ultimate Rain Gear Guide for Biking in the Rain
- The Ultimate Guide to Winter Bike Commuting in the Snow
Happy Biking!


6 thoughts on “How to Plan a Fun Bike Route with Google Maps”
You might be interested in my site, cycle.travel – https://cycle.travel/map . It aims to have the speed and ease of use of Google Maps, but with OSM’s detailed data, and smarter route-finding! It’s particularly suited to bike touring but you can use it for commuting and shorter leisure rides too. Always very happy to hear feedback/suggestions.
Someone linked this article on Reddit — have to say it’s a great guide, especially for some of us newer cyclists who might not be ready to try out other tools yet!
Just a quick tip from my experience — I’ve found it easier to map my route on desktop to plan some more detailed routes and vet them more easily with Street View like you suggested, then I share it to mobile so I can navigate on the day of my ride. However, any dragging around you’ve done on the map won’t carry over to mobile.
Instead I go with the waypoint approach, where I’m finding shops, restaurants, parks, even random people’s houses or churches to add to my route and coax Google into using that bike trail that’s a longer distance than the road next to it. It can take a bit of fiddling around and you only get up to 10 waypoints (though you can always break the route into 2-3 sets of directions), but I’ve found it to be well worth the trouble to have easy-to-read turn-by-turn directions out on my bike!